Seral - Part. 1b - OPNsense router 25 Gbps
How to build and configure your own OPNsense router for a 25 Gbps fibre link.
Hardware
Fibre connection
My ISP (Init7) does not use GPON. You plug in a fibre NIC and you have internet. Dedicated P2P fibre.
Result: no forced ISP box, a very stable fast link… and savings (no GPON). Well. Wait until you see the final bill.
The router
Forget saving money. If you are still here, you probably enjoy paying a lot for something useless, just to say you have 25 Gbps at home. Spoiler: unless you have a server and a real need, it will not help.
25 Gbps runs hot. Really hot.
Skip RJ45: fibre is mandatory, or cap at 10 Gbps. This config also works at 10 Gbps, in which case a Lenovo m720q, a Mellanox card and a fibre switch on the way in is much more rational…
Still here? Get the credit card.
Goals:
- a compact server,
- quiet,
- with an acceptable WAF (Wife Approval Factor).
Case: the Fractal Node 304 is perfect: small, clean, discreet.
Cooling, because noise matters:
Motherboard: Mini-ITX with a PCIe slot, e.g. the
ASRock Phantom Gaming-ITX/ax.
CPU: enough headroom for a light IDS (calm down, not at 25 Gbps)
The Ryzen 7 5700G does the job.
RAM: 32 GB, so you can sleep.
I sincerely hope that when you read this, RAM has not yet passed gold. I used DDR4 3600 CL16: Kingston FURY Renegade 16 GB (x2).
This stack draws real power, so the PSU needs to be:
- powerful
- stable
- quiet
The Seasonic 650W ATX 3.1 80+ Gold ticks the boxes.
Note:
The onboard Ethernet port only gives 2.5 Gbps.
For more:
- split PCIe and add a 10+ Gbps NIC,
- or use a managed fibre switch / a second Mellanox (or buy a 4-port card).
Cost (2025)
- Fractal Node 304: €90
- 2x Noctua NF-A9 PWM: €20 x2
- Noctua NF-A14 PWM: €25
- 2x Kingston FURY Renegade 16 GB 3600 DDR4 CL16 DIMM: €116
- Seasonic 650W ATX 3.1 80+ Gold: €110
- AMD Ryzen 7 5700G: €175
- ASRock Phantom Gaming-ITX/ax: €190
- 1 TB M.2 SSD: €110–200
Minimum total: ~€856 (without the extra fibre NIC or switch)
Install OPNsense
Plenty of install guides already. You need:
- a display,
- a keyboard,
- a USB stick.
Flash the ISO with Rufus, boot it, done. Links:
Configure interfaces
LAN
You should see three interfaces:
- igc0 (Ethernet)
- mce0
- mce1
Assign them first.
In the CLI, option 1:
- LAN → igc0
- WAN → mce0
Then option 2 for IPs, select LAN.
Answer as follows:
Configure IPv4 address LAN interface via DHCP: N
Enter the new LAN IPv4 address: 10.66.10.1
Enter the new LAN IPv4 subnet: 24
Configure IPv6 address LAN interface via WAN tracking: Y
Do you want to enable DHCP server on LAN: y
Enter the start address of the IPv4 client: 10.66.10.2
Enter the end address of the IPv4 client: 10.66.10.2
Do you want to change the web GUI protocol from HTTPS to HTTP: y
Do you want to generate a new self-signed web GUI certificate: y
Restore web GUI access defaults: y
Done.
LAN is ready. You can leave the CLI.
Plug Ethernet into the router, open a browser:
Default credentials:
- user: root
- password: opnsense
Change it immediately. Really.
WAN
For WAN, go to Interfaces → [WAN] and match the screenshot.
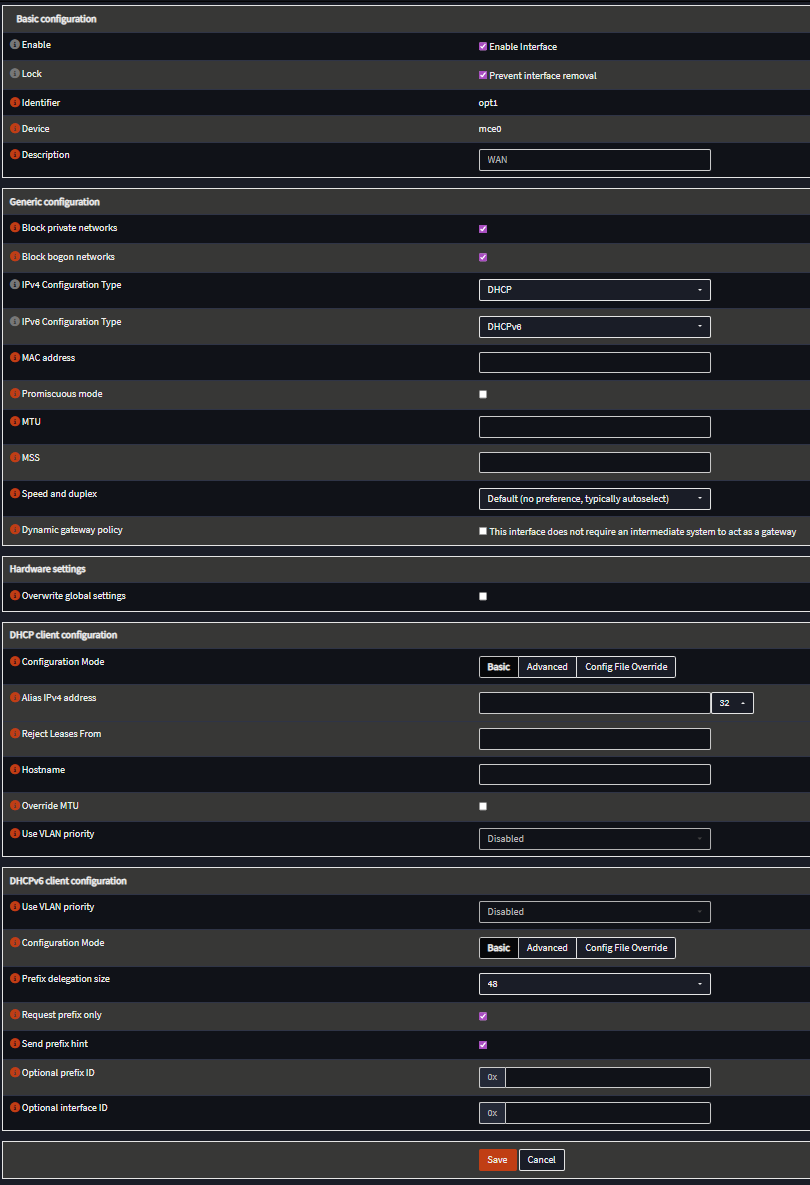
Init7 hands out IPv4 and IPv6 via DHCP, so nothing fancy.
Disable private and bogon networks. Useless here.
The DHCPv6 settings in the screenshot are for Init7’s Fiber7 plan.
Depending on the ISP you might need to:
- create a VLAN,
- change the MAC,
- add custom DHCP options.
Optional port
Remember the second fibre port?
Same as the m720q: bridge it onto LAN.
- Interfaces → Assignments
- Devices → Bridge
- Bridge igc0 and mce1
- Back in Assignments, assign bridge0 to LAN
The optional fibre port is live. Next: basic firewall setup.
opnsense homelab privacy security 25gbps init7 firewall router fiber mellanox ryzen proxmox
682 Words
2025-01-25 01:00 (Last updated: 2026-08-25 14:57)
314e5fc @ 2026-08-25